Link to: Russo - Turkish war vignette
This technique was not invented by me. I´ ve found it in László Adóba´s book "Let´s build a diorama, part II"
Let´s build a diorama II
The basic materials are very cheap and available in each household: powdered sugar, soda bicarbona, PVA glue, water.
Let´s start with the base. I covered the base with a mixture of glossy acrylic medium, fine earth, fine stones, MIG pigments. You can use PVA glue instead of acrylic medium. The advantage of glossy acrylic medium is, that the terrain will remain a little bit glossy (like real wet soil). If you use a PVA for the basic mixture you must apply a several layers of glossy varnish (diluted with water) on the dry "terrain".
The basic terrain
Now it´s time to make the melted snow. Prepare PVA glue, water and powdered sugar. Make a mixture of PVA and water.
PVA + water
Powdered sugar
Apply a several layers of PVA+water on places where you want the snow to be.
A few layers of PVA+water
Now it´s better to work fast. Add a few little piles of powdered sugar on the glue. Use a tip of a knife for sprinkling the powdered sugar. Let the first layer soak with the glue and repeat this process until you reach the desired thickness of "melted snow". 3rd and next layers will soak more difficult than previous. In this case apply more glue on the top of the pile with a brush. Only a gentle touch!!!
First layer of powdered sugar applied on the glue (it´s soaking now)
Using a brush to apply more glue
The snow will be semi-transparent. Like real melting snow. When it´s still wet add a little soda bicarbona (for simulating fresher snow on the top of the pile of melting snow). Use a tip of your knife again.
Adding a little soda bicarbona
During the drying process you can form the shape of the snow with the modellers knife etc...
Using a knife to achieve a desired shape of the snow pile
Now you can make a tea and start watching your favourite TV. The drying process wil last cca 24 hours.
After it´s dry, the fresher snow made from soda bicarbona will appear (the white stain).
Now it´s dry - the fresher snow look like a white stain
It doesn´t look O.K. and you must add more soda bicarbona. Now you make a mixture of diluted PVA and soda. You need a dense paste (like toothpaste).
Mixture of soda and diluted PVA
Apply the mixture on the base using fine brush. Arrange the shape of snow with moistened brush.
Applying of "fresh snow" with fine brush
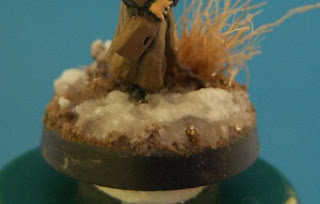
Now let it dry until it´s hard as a rock. The results are fantastic !!!! Don´t be affraid, the powdered sugar won´t be sticky after the snow it´s dry.
You can add some glossy varnish to simulate confluent water.
The results look fantastic


Very good tutorial!
OdpovědětVymazat(even it appears to be a little bit difficult way for me... but I notice it because it could be useful!)
Thanks!
Don´t be afraid. It´s very simple and relatively fast technique. Everybody can do it :-)
OdpovědětVymazatV.
Very nice technique. I keep this in mind and will do a test later. It looks like you can water to this way. Can you?
OdpovědětVymazatGreetings
Peter
http://peterscave.blogspot.be/
Good tutorial, must try this one day!
OdpovědětVymazatGreetings,
Remco
To Peter:
OdpovědětVymazatI haven´t tried it yet. Maybe it can be used for waves.
V.
Interesting and helful tutorial. Thx Alois!
OdpovědětVymazatMaybe I will create an Eastern Front wargaming plate full of snow and melted snow :-)
http://kukuruzas-corner.blogspot.de/